Beth’s tips for sea swimming in Brighton

Having worked several summers as a beach lifeguard in Brighton, our very own Bethan Male kindly shares her tip-top local knowledge, giving you top tips for the best sea swimming experience.

Tip 1)
When possible, swim off a lifeguarded beach. This means we can keep an eye on you and give you somewhere to leave your stuff (as long as you ask us nicely).

The link below details where all the lifeguarded beaches are and when they are open. As well as marking the lifeguarded swim area, the (round yellow) buoys also mark where motorised craft are not allowed, so it’s much safer to swim within this area. Lifeguard details: https://www.brighton-hove.gov.uk/libraries-leisure-and-arts/seafront/lifeguards?language=bsl

If we are flying red flags, this is because we do not think it is safe to swim. If you see red flags flying, come and chat to the lifeguard – the reason for this varies from bad water quality to fog affecting our vision, to stormy/challenging sea conditions.

Outside of Brighton, lifeguarded swim areas are marked with red and yellow flags.

Tip 2)
If you get into trouble, float on your back, put your arm up in the air, and the lifeguard will see you and help you.

If you are not in a lifeguarded area, lie on your back and rest – try not to panic and, if possible, slowly make your way back to shore. Nothing wrong with a bit of slow head-up breaststroke to get you into shore.

Tip 3)
Ideally, swim with a bright coloured cap and consider a tow float as this makes it much easier for us to see you when you swim out around the buoys!

Tip 4)
If you are a less confident swimmer or not swimming on a lifeguarded beach, swim along the coast rather than out to sea/around the buoys. That way, if you get into trouble, you can quickly get out of the water. While the buoys make a good target and sighting practice, they are a long way out to sea if you get into trouble.

If possible, swim with a friend and/or make sure someone knows where you are swimming and when you should be back. If you get into trouble, they can call the coastguard on 999.

Tip 5)
Wetsuits and water temperature.

The summer sea temperature is approx. 15-19°C. However, this is warm enough to swim without a wetsuit.

If you plan to swim without a wetsuit, start with short swims, allowing your body to acclimate to the cold.

Consider other benefits of the wetsuit – the buoyancy makes swimming easier and helps you float if you become tired. You will probably be racing in a wetsuit, so it makes sense to practise in it.

Tip 6)
Check the weather and surf forecast before coming down to the beach.
I would use the Met Office for the weather - https://www.metoffice.gov.uk/public/weather/forecast/gcpchgv78#?date=2018-07-14
And Magicseaweed for the Surf Forecast - https://magicseaweed.com/Brighton-West-Pier-Surf-Report/15/

Generally, offshore (northerly) wind means a calm flat sea and ideal swimming conditions. Onshore (southerly) wind creates more chop. The windier it is, the bigger the waves (i.e. big southwesterly storm = big waves and ‘shore dump’ as well as a very strong current west to east).

Tip 7)
Check and understand the tide times and what they mean.
You can also do this on Magicseaweed  https://magicseaweed.com/Brighton-West-Pier-Surf-Report/15/

As a general rule, when the tide is going out, the current will pull east to west, and when the tide is coming in, the current will pull west to east. Currents change and are strongest around 30-60 minutes before the tide changes (pulling in the direction it is about to change to) but vary in strength depending on the size of the tide.

We have spring (large) tides and neap (small) tides, which are determined by the moon. The current will be stronger during a spring tide due to the greater water movement. At its strongest, this current is tough to swim against, so plan the timing of your swim.

This current isn’t dangerous as it will only pull you along, not out to sea. However, it can become dangerous if you try to fight it – if you are not making progress, there is no shame in swimming into shore and walking back! (It happens to the best of us).

If you are unsure of the tide/current, ask the lifeguard, and they can advise you.

Tip 8)
Rip currents
In Brighton, we don’t really have any dangerous rip currents that would take you out to sea; however, elsewhere in the UK, this is not the case.

However, we often get small rip currents around groynes and other objects sticking out to sea, which threaten children and non-swimmers.

Dangerous rip currents are, however, very common elsewhere in the UK. Before swimming in an unknown body of water, try to find some local knowledge beforehand. Here is some advice from the RNLI for if you do find yourself in a rip current:
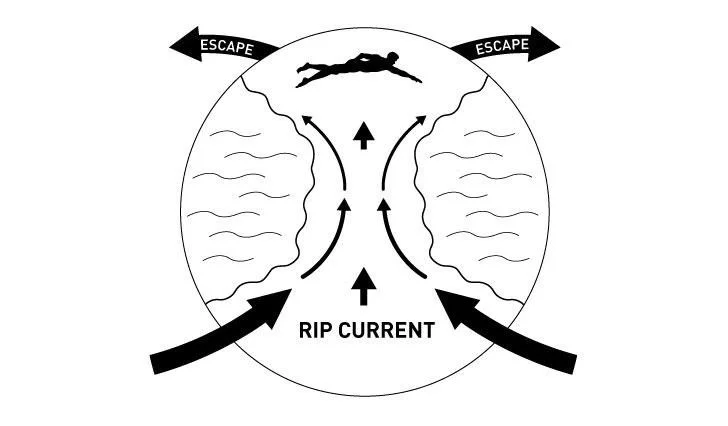
Rip currents are a major cause of accidental drowning worldwide and the top environmental cause of our lifeguard incidents. So, what are rips, how can you spot them and - if you ever find yourself caught in one - what can you do?

Rips are powerful currents caused by waves breaking on shallow sandbars and pushing water back to sea through deeper channels. Sandbars are submerged or partly exposed ridges of sand that are built up by the action of tides and waves.
People can easily get caught out by rip currents because, to an untrained eye, they can look like a calmer place to enter the water.

There are several indicators of rip currents that you can look out for:
•    darker patches in the water beside shallower sandbars
•    rippled or churned water without breaking waves (as shown in the centre of the photo above)
•    formation of foam
•    bits of debris floating out to sea
•    and discoloured brown water where the sand beneath has been disturbed.

Rir-Current.jpg

Five steps to escaping rip currents
1. Avoid them, where possible
Always swim between the flags and on lifeguarded beaches. Flags are marked based on where it is safer to swim in the present conditions.

2. Alert others
If you’re struggling in a rip current, always raise your hand and shout for help. Even if you can get out of it, it pays to have others ready to help.
Keep hold of anything that floats, such as a bodyboard or surfboard.

3. Don’t exhaust yourself
If you try to swim against the force of a rip, you’ll lose energy very quickly. Stay calm and float to assess the situation.

4. How deep is the water?
If you can stand, wade out of the current, don’t swim. Rips can flow at 4-5mph, which is faster than an Olympic swimmer!

5. Swim parallel
If the water is too deep to stand, and you can swim, swim across the direction of the current, parallel to the shore until you are free. Use any breaking waves to help you get back to the beach.
Relax and float for around 60-90 seconds if you need to catch your breath. Some rip currents recirculate rather than flow out to sea and may bring you closer to shore.

Critical Swim Speed (CSS) Test

Triathlon swimming is about endurance, not raw speed, and we need to train for this. In running or cycling training we are taught to find our threshold power (or pace) and then progressively increase our time on or about this measure to improve our ability to perform under pressure. Working at threshold is about aerobic endurance - in fact, threshold is often defined as “an athlete’s fastest sustainable aerobic pace or effort.” Developing the aerobic system takes time, because we need to build new capillaries to exchange more oxygen, create new mitochondria in your cells to power more respiration, and teach our systems to oxidise more fat.

We can apply this same principle in swimming. To do so we need to swim at a pace that can be considered as our "sweet spot" - a pace that can be estimated from a simple test. We will be doing this test in both swim sessions this week (1st & 3rd Feb). If you intend to swim with the club across February and March you will need to do this test, either in one of these two sessions, or in your own time. Here's how to do it:

1. warm up thoroughly, at least 15 minutes of easy swimming with a few speed spikes to fire up the system

2. using a timer (watch, pool clock etc) time yourself over the fastest 400m (16 lengths of a 25m pool) that you can manage

3. rest and swim easily for 5-8 minutes

4. using a timer (watch, pool clock etc) time yourself over the fastest 200m (8 lengths of a 25m pool) that you can manage

5. send Graeme (graeme@brightontri.org or on WhatsApp) these two times and the date that you performed the test

We will then perform a simple calculation on these two times that gives your Critical Swim Speed (CSS). This is the pace we will ask you to swim at for the main section of each club swim in Feb & March.

Top tip: Your fastest split over 200m & 400m will almost undoubtedly be achieved by starting at a pace that you will initially consider 'easy'. Go off hard & fast and you will blow up halfway.

How to test your bike Functional Threshold Power (FTP) at home. 

How to test your bike Functional Threshold Power (FTP) at home. 

The clubs online turbo sessions are great structured training program to get you ready for the new season. To make the most of them, you need to have an accurate idea of your FTP. Smart Turbo trainers are a perfect tool for this.

If you have access to Zwift, TrainerRoad, Rouvy, Sufferfest, Fulgaz, Road Grand Tours, or one of the other virtual cycling environments you can use their built-in FTP test which does it all for you. You will usually find them in the Workouts section of the relevant software, they typically offer both 20-minute tests or MyRide style Ramp tests, you can use either. All these virtual training platforms offer a free trial, so you can sign up and do your test and see if you enjoy the apps without any commitment. Many Turbo Trainers manufacturers Apps also have a built-in FTP testing procedure.

If you don't have access to the above or want a more straightforward solution then following a good warmup, you can do a 20-minute ride on your turbo at the maximum pace you can consistently hold. You will need your power meter or Smart Turbo connected to its app or your Garmin (or other compatible smartwatch or bike computer) to calculate your average power output.

Read More

Why Should I Join a BriTri Online Turbo Session?

Why Should I Join a BriTri Online Turbo Session?

There are lots of benefits to this hour of power. First, just working in a group is motivating and a lot more fun than watching Netflix or Zwift roll by. Secondly, the sessions are structured and progressive—and currently focused on sweet spot training—meaning that they will genuinely improve your cycling capacity over time. Finally, it’s a simple session to include in your day. Just throw the bike on the turbo, log into Zoom and do what you’re told. At the end of the hour you will have had a solid aerobic workout with no mental effort at all.

What Does ‘Sweet Spot’ Mean?

When we’re training for sustained effort on the bike—as we do for what is effectively time trial effort in triathlon—we need to improve our Functional Threshold Power (FTP). Your FTP is essentially the maximum power output your body can sustain for around 60 minutes under race conditions.

Read More

What Do I Need for Online Turbo Training Sessions?

What Do I Need for Online Turbo Training Sessions?

Updated January 2021.

Now that we have restarted our online turbo sessions, you may be wondering what you need to take part. Indoor bike training has become hugely popular during the pandemic, but it can seem overly complicated. While you can get very high-tech, you don't have to. We’ve outlined two simple options and what you’ll need to get started.

Basic Setup

With this setup, the coach will give you an effort level, such as 7/10 or 8/10, plus the time you will be maintaining it. All you have to do is adjust your resistance to reflect that effort level, and follow their instructions.

Read More

MyRide update.

Withdean Studio.png

I realise we get new members all the time and some of you may have no idea what's going on with our indoor training. I also think it's worth updating the old hands with what we are doing in the next 8-week block.

Race season is racing up on us fast, so we need to start adding some speed to all that lovely base we've been building over the winter. We'll be adding back the VO2 max intervals as the block progresses. We all remember how much fun they were! Come race day you'll be smashing it.

These sessions follow less of a structured block approach than the previous two blocks, and each session stands alone quite well. While doing the whole block is best, if you can't, then dropping in and out of these sessions will work as part of your training plan. Whether you're a complete beginner or an experienced athlete, they'll add another level of quality to your training.

If you've never been to a session and want to have go, you'll need to get on the WhatsApp group and put your name down for a seat. We keep spare seats for every session.

If you want to secure a seat in advance you'll need to buy a block, Friday is sold out, but there are Monday blocks available. All the info is on the webpage including how to get on the WhatsApp group, visit the club’s website www.brightontri.org/indoor-cycling

Rick

REFLECTIONS ON MY YEAR AS HEAD COACH- Rachel Perry

Some of you will know I’ve stepped down as head coach, and some of you may have not even met me or knew I existed!  I’ve been lucky to be surrounded by a group of extremely knowledgeable and passionate coaches, so it’s very much been a team effort. We are lucky to have a large number of qualified coaches in the club  (10 level 1, 10 level 2 and 1 level 3 British Triathlon, 4 triathlon activators, 2 British Cycling coaches and 2 England Athletics coaches!), expecting two new British Cycling coaches and two new triathlon coaches in the autumn. 

One of the challenges of a club of this size (currently 200+ adult and 50+ youth members) is to provide appropriate coaching for our members at both ends of the spectrum: those new the sport and keen to dip their toes into the water of triathlon for some fun and enjoyment, and those at the sharp end of competition, heading off to World Championships representing GBR. Not only that, but triathlon gives us a range of distances from supersprint right up to ironman distance. It’s not an easy task to achieve! I like to hope we achieve our goal, providing something for everyone. 

One of the things I’m proud we have achieved this year is getting our coached open water swim coaching (affectionately known as COWS) running regularly throughout the open water season, as well as 4 novice sessions for British Triathlon.  We’ve introduced the immensely popular MyRide sessions, regular Sunday road rides and trail runs, and a weekly presence at the track for focused run technique and fitness. I have also organised coach education, with workshops by Fiona Ford from Swim Smooth, and open water swim safety skills and first aid education delivered by Susan Reynolds from Blue Response.

None of this would be possible without our wonderful volunteer coaches- don’t forget all our coaches turn up in rain and wind for the love of the sport, and the satisfaction of seeing you turn up, train, improve and achieve things you maybe didn’t think possible. The coaches all want to train and race as well. If you’ve learnt something or achieved something thanks to our coaches, do remember to share it with them at the next opportunity!

What have I learnt as Head Coach? Although I achieved a few things, there were lots more things I would have loved to integrate but ran out of time in the day. Yet again I remind myself that what I think could be possible with my time, and what is actually achievable are different things. I found it’s impossible to coach regularly and focus on your own training plan. My training became ad hoc and unfocussed. I decided to enter sprint distances this year as it was easier to fit in around unstructured training. Somehow that plan worked and I enjoyed not having to worry about time or distance when training, I could just enjoy exercising and being outside (or inside with music for MyRide). I think it’s easy to forget when we have a very structured training programme that we do this to enjoy it- none of us are professional athletes trying to make a living from sport. Sometimes it’s nice to leave the Garmin/Polar/Suunto at home and go and enjoy the scenery and social time.

Lastly, a  big thank you to cycle lead coach Rick and run lead coach Ian, and my right-hand man Sir Chairman Swickers and of course ALL our amazing coaches. I won’t disappear completely, I’ll still be along to coach and train (with or without my Garmin).

MyRide, the story so far..

We’re coming to the end of the second 8 week training block so I thought I’d do a quick update on what’s been happening and what the future looks like.

Withdean Studio.png

If you’re wondering what this is about and you’ve no idea what the clubs MyRide sessions are here’s a brief recap. At the beginning of the year, we were able to get access to the new MyRide studio at Withdean Stadium. It’s similar to a spin studio, but the bikes offer digitally connected power-based training. A bit like Zwift or Trainerroad but all in one room and connected to the same giant screen. Each bike is “tuned” to the rider via a phone app and uses the riders own power data. This way we can all do the same workout in an individually tailored way.

So far it’s proving to be a pretty impressive training tool. From a coaching point of view, we are able to deliver what amounts to individual training in a group environment. A giant leap for group training. Anyone who’s been a regular attendee will attest to the efficacy of the sessions, and we’ve had some very impressive improvements in FTP (functional threshold power).  I’m expecting to see happy faces all round on race day.

It doesn’t just benefit your cycling either. A lot of the threshold work we do is of huge benefit to your run and even your swim. Fitness is Fitness after all. Your heart doesn’t know if you are riding a bike or running up a hill, all it knows is it needs to pump. If you’ve picked up a running niggle or a shoulder tweek and you can still push the pedals, there’s not many better ways to keep your fitness level up while you recover.

uphill_cycling_600.png

So far we’ve done a strength phase with hill climbs and some big gear work, we followed up with an FTP build using longer sweet spot intervals and recently we’ve been doing a VO2 max block to add a bit of extra speed. All that may sound like complicated coaching speak, but as a participant, all you have to do is pedal till the screen goes yellow, or blue or green or whichever effort level is required. Simple and complex all at the same time. Simplexity.

Unlike the old Turbo sessions, we’ve decided to keep these going through the spring and summer (subject to popularity). For the next series of training blocks, we’ll be doing “peak” period workouts. We’re working to a general plan across all sessions (Swim bike and run) that assumes the summer is race time. The MyRide sessions will be a mix of everything we’ve done so far with an emphasis on maintaining speed and keeping you sharp for the season. If you imagine a 2-hour road ride with a few hills, some sprints and a bit of a race (yes there’s a race mode !) all squashed into an hour, that’s what we’ll be doing. The upcoming sessions should be a lot of fun.

So if you haven’t been involved so far there’s no reason not to take the plunge now. New blocks are on sale or you can join the Whatsapp group and take one of the PAYG seats to try it out.

You can find out more on the website with links to the blocks and the Whatsapp group.

Rick

https://brightontri.org/indoor-cycling/

Looking for a new challenge? Try being a pacer: Notes from a pacer and pacee

Pacer: Rachel

Rachel and Cathy 2018.jpg

I love Brighton Half marathon and sign up every year. I figure it will motivate me to train well through the winter. I haven’t actually raced it for two years due to illness, and in fact, I haven’t run that distance either for two years. During training this year I realised that I had forgotten 13.1 miles is actually a long way! Training went OK, and I kept injury-free. Cathy mentioned she was hoping to get round in less than 2 hours for the first time, and I offered to help pace her. Or maybe I told her I would pace her. I’m normally around the 1 hour 50 mark, so felt confident I could help Cathy with her goal. It actually felt good to take pressure off myself to try and achieve my own PB- the only thing I had to concentrate on was making sure we both got round in 1:59 or less.

I formulated a plan. Having seen Cathy at a ParkRun recently, I knew she tended to start too fast, and then fade towards the end (which we all tend to do). My plan was to, therefore, start slightly slower than she wanted to run it, and then slowly increase the speed. I planned for us to start at 5:40/Km, which would bring us home in 1:59, but if Cathy felt good I’d try to get us to 5:30/Km.

Brighton blessed us with beautiful if slightly chilly racing conditions. TopTip: Disposable hand warmers inside your gloves. We started out slightly faster than I was planning- this is usual for races as you feel great after your taper AND you are surrounded by a mass of fast running people, so you go into wild stallion/mare mode and keep up. I reined us in a little and then we settled into a nice steady pace. I used a lot of internal and external cues with Cathy. Getting her to tune into how she felt was our first step- Comfortably uncomfortable was the goal. It’s a pace that means you’re running hard, but not so hard that you’re going to suffer later on. You should be able to keep going. Save uncomfortably uncomfortable for your ParkRun PB! We then locked into our 5:30/Km pace- once you have that comfortably uncomfortable speed, it’s really important to mentally ‘lock-it-in” and stop thinking about it.

We saw lots of BriTri supporters through the course, which really boosted us, and the miles kept being ticked off at our metronomic pace. Getting to mile 9 and things started to get tough for both of us. Clearly, I wasn’t about to mention my niggly hip and calf! I used some external distractors, which Mike Porteous taught me. The "sense-ational" running technique: every few minutes you concentrate on one of your 5 senses. What you can see (blue sky, sun, yippee!), what you can hear (cheering, clapping, awesome drumming band), what you can smell (ahh, the sea!), what you can feel (my comfy new runners, forget the hip niggle!) and finally what you are going to eat when you finish (roast+pint).

We hit Hove Promenade, and unfortunately the last 5 Km was into the Beast from the East headwind. Cathy tucked in to draft behind me, and I tried picking up the pace to 5:20/Km. A little chirp from behind me: “You’re getting faster! I can’t go any faster!” “No, I’m not! Stay with me!”  Nevertheless, I knew we were well on target for our goal, and cruised down the final stretch to cross the line in a formidable 1:55:56.

Cathy was obviously elated, and so was I. It was a really enjoyable race, and taking the pressure off myself to achieve was really interesting. Clearly, I still had pressure on myself to ensure we got in under 2 hours, but this was a different pressure. It really felt like a team effort and was still challenging in its own way. I really enjoyed the planning, and to see the plan executed perfectly was really rewarding. The pint and the roast afterwards were the best. So, if you fancy a different but hugely rewarding challenge, try pacing someone to a new race PB. It might teach you a lot about your own pacing strategy.

Pacee: Cathy

I was fortunate to have Rachel as my pacer for the Brighton half marathon.  I have been trying to finish a half marathon in under two hours for the last couple of years, the closest being 2 hours and 45 SECONDS.  Conveniently, I forgot my Garmin watch on the day, so was reliant on Rachel for timings.  I knew I needed to do approximately 9-minute miles, but usually running in min/km I didn’t know how much that was, so I basically left the clock-watching completely to her.  
 
I think the most notable thing for me was that we started at a very measured pace and kept that going.  Having Rachel there distracted me from looking at how many people were overtaking me in the beginning (Rachel’s note: we then proceeded to overtake loads of people through the rest of the race which gave Cathy a real boost). I have a tendency, as a lot of athletes do, to go out too hard then get knackered at about the halfway and lose pace.  My concentration has a tendency to wander (such as when watching seagulls or waving at people), and I slow down, but Rachel kept the pace steady over the whole 13.1 miles, except the last two miles when she increased the pace (thinking I wouldn’t notice but I did).
 
We ended up finishing in 1:55:56, which I am still chuffed about. It was a really valuable lesson in how to keep a steady pace for the whole race and stay focused on the race I was running.  I don’t think I would have managed it as successfully myself, so am very grateful to Rachel for helping me crack the two-hour demon!

Let's Talk Technique Baby

Technique Baby.jpg

For those of you who came to a coached swim session this week, you may have wondered why we had a whole hour dedicated to technique. It can feel frustrating when you want to improve your swimming speed to spend time swimming slowly, concentrating purely on technique. Surely, to swim faster you need to practice swimming faster? Sadly, this is not the case. If you have technique limiting factors, you will reach a ceiling with your swim speed, no matter how fast you swim in training. In fact, you’ll be reinforcing that bad technique with every stroke!

Cathy Poolside.jpg

If you want to swim faster you have to ensure your technique is good and your stroke faults are corrected alongside sessions to improve your speed and endurance. Even our speedy swimmers in lane 5 have factors that can be improved, which will unleash even faster-swimming potential. Performing a pure technique-centred session allows you to slow down and really concentrate on specific aspects of your stroke. Concentration is vital- you really have to think about what your body is doing, feel how the water moves against your arms and legs, and visualise how your hand enters the water and starts the catch. What better way to forget about that horrendous day at work!

If you’re not sure what perfect technique actually looks like, you can download the Swim Smooth app for free. This allows you to visualise Mr Smooth swimming from all angles and at all speeds. Don’t worry, we’ll be back to endurance and CSS sets at Wadurs soon!

http://www.swimsmooth.com
 

Rest, the art of doing nothing.

Rest.jpg

The biggest myth in endurance sports is that training makes you fitter and faster. It doesn’t. Training makes you tired, damages your muscle tissue and depletes your energy systems. No one ever finished a 10km run and thought “wow, I feel stronger than when I started”. If training made you fitter, then doing 12 hours a day, 365 days a year would be the answer to all our weaknesses. 

The truth is, rest makes you fitter. The part in between training makes you stronger, faster and better adapted to your goals. 

When training you apply stress to your body in a variety of different ways. When you stop and rest, the magic elves in your body run around and fix the things you’ve broken. While they’re at it, they make a few adaptations to make you better for next time. If you don’t give yourself enough rest, the elves don’t have enough time to fix you, and your body won’t make the adaptations it needs. 

Successful training is stressing the body to ask for adaptations then allowing time for your body to make them. 

If we’re honest, we all think if we’ve sat still for ten minutes we’ve lost fitness. We think all our competitors are out there running, swimming or biking their way into beating us. Social media doesn’t help either, Strava league tables and photos of club mates churning out the miles while you’re sat on the sofa eating Doritos. 

94317-90736.jpg

Unfortunately, when we train hard and don’t recover properly, we find our performance stagnating or going backwards, this can lead to a vicious cycle as the solution seems obvious. Train more. We can all see how that works out. 

The reality is that most of us would probably be faster with a bit less training and every bit as fast with a lot less training. Or to put that another way, we’d all be faster with a bit more recovery and a lot more recovery wouldn’t do us any damage. 

If you combine that extra recovery with an increase in training quality, you are on to a winning formula. Less Junk, more quality, better recovery. 

As Shane Sutton liked to say, There’s no such thing as overtraining, just under recovery. 

So how do you do recovery?

Realistically, unless you’re an elite level athlete, a young athlete or a pro, recovery means doing nothing. Pros might do recovery runs, swims and rides but for most of us, particularly masters athletes, recovery should be doing as near to nothing as possible. Let’s be honest, how many of us are disciplined enough to do a proper recovery paced session without misbehaving. Obviously, life gets in the way but remember Pros don’t do full-time jobs and recovery runs. They don’t spend the day looking after the kids and shopping before a recovery bike. They sleep half the time, get a massage, drink a few Kale smoothies and head out for a recovery swim. If you’re not a pro, take a nap in front of the fire instead. My favourite rest motto is “don’t stand when you can sit and don’t sit when you can lie down”. 

rest-52495_1280.jpg

Don’t wait until later to start recovery though. Recovery starts as soon as training finishes. You need your nutrition ready to go as soon as you stop. If you finish at home that’s easy. If it’s one of the club sessions, bring it with you. You need to feed your recovery elves. A small amount of protein and some carbs within the first 40 minutes is the biggest helping hand you can give yourself. Don’t wait! 

Finally, plan for it. We’re all great at planning what we’re going to do but how many of us are planning for what we’re not going to do?  Have a look at your training diary for the last few weeks and the next few weeks. How many rest days are there? How many of you got halfway through your last rest day, panicked and went for an “easy swim”? 

Plan some proper rest into your schedule. Make it specific. Make sure easy days follow hard days and easy days precede your hardest breakthrough workouts. You can’t do a massive power interval workout the day after a 100km tempo ride. Your rest days should follow your breakthrough sessions. Whether that’s a Parkrun PB attempt, a 10km race, your first 4km swim of the year or a big hills session on the bike. Those days when you are looking to progress to the next level need to be followed by time to adapt. It might mean having to miss out on some of the club sessions or an event here and there, but you’ll be stronger and faster for it. 

So be realistic about yourself and your level of discipline. Get quality nutrition at the right time and plan some regular rest into your schedule.

If you do this, it comes with a go faster stripe. 

Break through swimming and the Tri Camp Mallorca

graeme by the pool.jpg

It’s a fairly obvious direct correlation that more swimming makes you a better swimmer. My basic rule of thumb has always been “twice a week to maintain, three+ to improve”. However it’s also a truism that more isn’t always better - and when we’re talking about training, more can mean injury, over-tiredness and reinforcing technique errors that will eventually become blockers. So what are the top tips for improvement, and how can the training camp help this process?

swimming-reduces-stress.jpg

1. Prepare. At the club camp, we will have a swim session on every one of the six core training days, plus we will be getting into the sea on at least a couple of afternoons. That means between 9km and 15km+ of swimming is available in a week, which is probably a lot more than you’re used to. To get the benefit of this, I recommend planning a steady ramp in your swim volumes in the weeks leading up to the camp, meaning that two weeks before you should be in the pool three or four times, to ensure that you can handle the increased load. Remember to arrive at the camp fresh though - taper for those last few days before the flight!

Swim-smooth.jpg

2. Swim smart. We will make sure that everyone attending the camp knows their Critical Swim Speed before they arrive - a pace around which your training will be based. This pace is key to handling the volume and intensity of swimming that we will be doing in the week and keeping in check the energy and enthusiasm that we always see when people first arrive. It’s not how you start the week that counts, it’s how you finish!

3. Skills for the win. The fantastic part of such dedicated time to train is the focus we can put on skills. We will be videoing everyone both under and above the water and providing detailed feedback on how to tune your stroke, tracking that improvement across the week and giving you your video to take back with you, plus we will feed our key recommendations and videos back to the rest of the BriTri coaching team, meaning that your progress will continue under their expert eyes once you’re back at Wadurs! I guarantee that everyone coming will leave with guidance on stroke improvement that will translate into speed and efficiency in the water, and most will experience a measurable improvement in CSS in the process. Your best swim split awaits...

spa.jpg

4. Recover. When all is said and done, it’s more important to swim well than to just turn up. Everyone on the camp should feel good about having a lie in and missing a swim if fatigue starts to become a serious issue. There will be so much on offer on our week in the sun that most people will struggle to do everything. Rest is as important as the training itself - welcome to the life of the professional athlete!

https://brightontri.org/training-camp-2018/

Winter Cycling Guide

Group-shot-1.jpg

Cycling outside during the winter months can help to build your aerobic base of cycling endurance fitness, can improve your bike handling skills and can be a highly enjoyable, social outing. It also has the potential to be cold, wet, miserable and downright dangerous. Before deciding to head out onto the roads for a bike ride, you may also want to consider these alternatives:

Group-shot-2.jpg

Mountain biking, off-road can certainly improve your bike fitness and bike handling skills and can be a safer option than heading onto the busy roads. There are great trails to be found in Stanmer Park, Friston Forest and up on the South Downs.

velodrome.jpg

Velodrome, we train every Saturday at the velodrome in Preston park from 07:45-08:45. It’s a good way to get used to cycling in colder conditions, without the worry of cars next to you. This can also give you the confidence and skills to join in our group Sunday rides in the spring once it's warmer. Please note we cancel the velodrome session if there is any risk of ice.

Indoor cycling is possible too:

  • Come along to one of our indoor cycling sessions held in Withdean Sports Complex’s MyRide studio. Learn more >

  • Alternatively, you can cycle in the comfort of your own home if you invest in a turbo trainer or rollers. A turbo trainer locks in and elevates the back wheel of your regular bike (as long as it has a quick-release skewer) so you cycle in the comfort of your own home. You can listen to your own music or watch a film, or for extra motivation, you can sign up for an online training platform such as Trainer Road, or our favourite- Zwift.

If you do head out onto the roads, the following guide will help to keep you both safe and warm.

1. Club Rides Sunday - keep an eye on the Met Office weather report for Brighton, which will give you accurate weather and temperature forecasts, as well as ice and flood warnings https://www.metoffice.gov.uk Please note, if the temperature is forecast to drop below 2 °C on Saturday night, or if strong, gusting winds are forecast the club ride will be cancelled. Keep an eye on the members’ Facebook page. If you do decide to head out cycling, you need to be sure that you’ll be warm and safe, so read on to find out how.

2. Clothing - there is nothing worse than being cold on a bike ride, so investing in and choosing the right clothing can make or break a good ride. Layers help to keep you warm, but the most important aspect of your clothing should be that the outer layer is windproof (gloves, jacket and tights). Start with your outer layer- then add layers beneath that (sometimes only a long sleeve base-layer under your windproof jacket or jersey is all you need).

Helmet- this goes without saying, but a helmet should be considered mandatory for cycling at any time of the year. It should be comfortable to wear, and the chin-strap should fit snugly under your chin to stop the helmet moving about. The ratchet at the back of the helmet should also be tightened to keep the helmet in place. The front of the helmet should be just above your eyebrows. The helmet shouldn’t be jauntily perched on the back of your head. How old is your helmet? They do deteriorate with time, so if you have an old helmet at home, or especially if it has received any knocks or bangs then consider investing in a new one. Something to look out for is MIPS, which gives an added protection against rotational forces should you come off your bike. If you do fall and the helmet takes a knock, you must replace it, even if it looks OK. Extra warmth can be gained by wearing a beanie or headband under the helmet.

Puncture.jpg

Choose a good base layer, followed by a windproof winter cycling jersey or jacket. Having a packable gilet or rain jacket in your jersey pocket is a good idea so that you have an extra layer if it’s cold, or if you stop for coffee or a flat tyre. If you have space in your jersey or jacket pocket, consider taking a fresh base layer to change into when you do stop for coffee. It can really help to keep you warm on the cycle home!

Winter windproof cycling tights can help to keep your legs warm. Alternatively, you can wear your regular cycling shorts with a pair of running tights over the top.

Hand and feet can get exceptionally cold as the outside temperatures drop, so investing in good gloves and footwear is essential.

Hands: winter cycling gloves are available which can offer warmth and wind protection. A thin liner glove worn underneath can make a big difference. Some people like ‘lobster-claw’ gloves for when it gets really cold, but not everyone likes these due to difficulty changing gears. Brands to look out for include; SealSkinz and Roekel.

Feet: Winter Goretex cycling boots can be a good (if costly) investment- go for a size larger than you would normally wear so you can wear winter weight socks. Alternatively, invest in a pair of neoprene overshoes, which offer warmth and rain protection. Do make sure your feet have space- don’t be tempted to wear two layers of socks if your feet then feel tight in your cycling shoes as they will actually feel colder. Wear a pair of merino wool socks, and try wrapping them in aluminium foil before putting on your bike shoes- it can make a big difference!

Sunglasses should still be worn in winter as it helps to protect your eyes from drying out, and can actually improve your visibility. Go for lenses suitable for low light conditions, or even clear lenses.

Hi-Viz rules! While an all-black cycling outfit may look very cool, it can make it exceptionally hard for drivers to see you. Invest in brightly coloured cycling clothing, especially Hi-Viz options such as; gilets and rain jackets. 

3. It’s all about the bike! There are a few adjustments that can help to make your bike safer and more comfortable for winter cycling:

Winter bike. If you have an old road bike, use it in winter. Don’t be tempted to ride your expensive race bike if you have one. Winter cycling does take its toll on the bike, and salt from grit on roads can pre-dispose to corrosion. Whichever bike you use, wash it when you get home, even if it’s just a quick hose down.

Tyres. Choosing the right tyres is very important. Most standard road cycles are fitted with 23mm wide tyres. Changing these for wider 25mm or 28mm winter or all-season tyres can increase traction with the road surface and also help to guard against dreaded punctures. A favourite tyre is the Continental Grand Prix 4 season. Also reduce the tyre pressure slightly to enable more of the tyre surface to have contact with the road surface and therefore increase your grip. 

Safety check and service.   Autumn is a perfect time to get your bike serviced by a professional mechanic, to ensure everything is in safe working order for your winter cycling. You should also perform your own safety check before setting out on every ride. An easy way to remember what to check is to use the ‘M’ check- have a look at this video by British Triathlon, which explains it: https://www.britishtriathlon.org/news/make-sure-your-bike-is-ready-to-ride-with-beacon_6978

Light up like a Christmas Tree! Do use front and rear bike lights when cycling in winter, even during the day. A good quality bike light can really make you obvious to car drivers in the dim light conditions of winter. 

Mudguards (such as the Raceblade) can be easily and quickly fitted to most road bikes. The cyclist behind you on a group ride will really appreciate your effort in doing this! 

What to take with you?

i.    You should know the route before setting out. If you have a GPS device, ensure you download the route before the ride. It’s worth also considering taking a paper map with you in case technology fails or batteries run out.
ii.    A fully charged mobile phone in a waterproof bag
iii.    Cash (at least £10) and a credit card. You don’t know when you might need to get a train or taxi home or buy emergency food supplies.
iv.    Food and drink. You will still sweat in winter, and should, therefore, carry water (+/- electrolytes) on the bike. It’s also worth taking a snack with you or energy gel. You can burn a lot of energy cycling in winter, and there’s nothing worse than running out of energy (a.k.a. bonking), especially when it’s cold outside!
v.    A spare inner tube or two, a small hand pump, a CO2 inflator and control valve and a small cycle multi-tool. These can be carried in saddlebags, your jersey pocket or in carriers that are like water bottles and go into water bottle cages. A CO2 inflator is a canister of CO2 gas, which, when attached to the control valve can inflate a tyre in seconds. Much easier than pumping for several minutes with a hand-pump!
vi.    A first aid kit and a foil blanket. Accidents can happen, and if they do it’s important to be prepared. A small foil blanket can easily be carried and can prevent an injured cyclist from becoming hypothermic.
vii.    Identification. If you do cycle alone and have an accident, it’s really important that you can be identified quickly, especially if you have any underlying medical conditions. Identification bracelets can be bought which have your name, date of birth, blood type, and who to call in the event of an emergency inscribed on them. An example can be found here:  https://www.roadid.com

4.    When cycling.

a.    Try not to cycle alone in winter, but if you do, consider using something like Garmin LiveTrack or Strava Beacon so friends or family can track your progress. 
b.    Roads can become very pot-holed in winter, and debris can get washed onto the road surface from heavy rains, which means that punctures and potential accidents are more likely. To avoid these:

•    Try not to cycle too close to the kerb. This is where a lot of debris will collect as it gets washed into drains.
•    Proceed through puddles with extreme caution. There may be a pot-hole full of water which could make you fall off.
•    Take it carefully on descents and heading round corners. Oil, leaves and other debris can become very slippery in winter even without ice.
•    Remember the front brake is the most powerful brake, and forceful application can lock the front wheel and make you skid. Use the back brake more,  to slow down, by dabbing/feathering it rather than grabbing it tightly.
•    If you do encounter ice, do not be tempted to brake suddenly, as this will probably ensure you fall off. Instead, don’t touch the brakes, but roll over the ice until it’s safe to gently apply the back brake staying as relaxed as you can.

Winter can be a great time to work on your cycling fitness and improve your aerobic endurance. It’s also a great time to get to know your fellow club members in a social group riding/coffee-drinking kind of way. Follow our tips for safe and comfortable riding and we hope to see you soon!

coffee.jpg